The MVP Process
Today we are going to take a look at the MVP process that we follow at Zynath. It may differ in some details from the standard agile development methodology you are familiar with. The traditional approach works great for pure software startups with little to no immediate regulatory concerns.
Our approach is mainly optimized for startups developing solutions for highly regulated industries, such as medical or finance, or startups that are working on hardware, or hardware / software products, because hardware is hard :)
First, we will quickly talk about what an MVP is, and why it is essential to make an MVP of your product. Then, we will go through our 7 Step Process where we walk you through from Ideation to MVP launch, and tell you about some of the pitfalls that you might experience during the process.
Let's dive in!
What is an MVP?
MVP stands for Minimum Viable Product. But what does that really mean? Let's look at an example to understand this concept better. And, what better example than one of the largest companies in the world, Alphabet, formally known as Google. Alphabet is an enormous company and was renamed to Alphabet because they have so many subsidiaries. Gmail, YouTube, AdWords, Waymo, and Google Cloud, just to think of a few. A whole alphabet soup of related companies, but they started with one very simple idea.
Google's founders, Sergey and Larry, noticed that in academia a scientific article is valued more if it has a lot of references from other articles to it, so they thought to themselves: why not apply the same strategy to ranking web pages? And, that is what they build, a ranking engine that would crawl through the internet, index all the pages it finds, and track how many pages point to each individual other page. The more "backlinks" there are, the more valuable that particular page must be. Brilliant and simple!
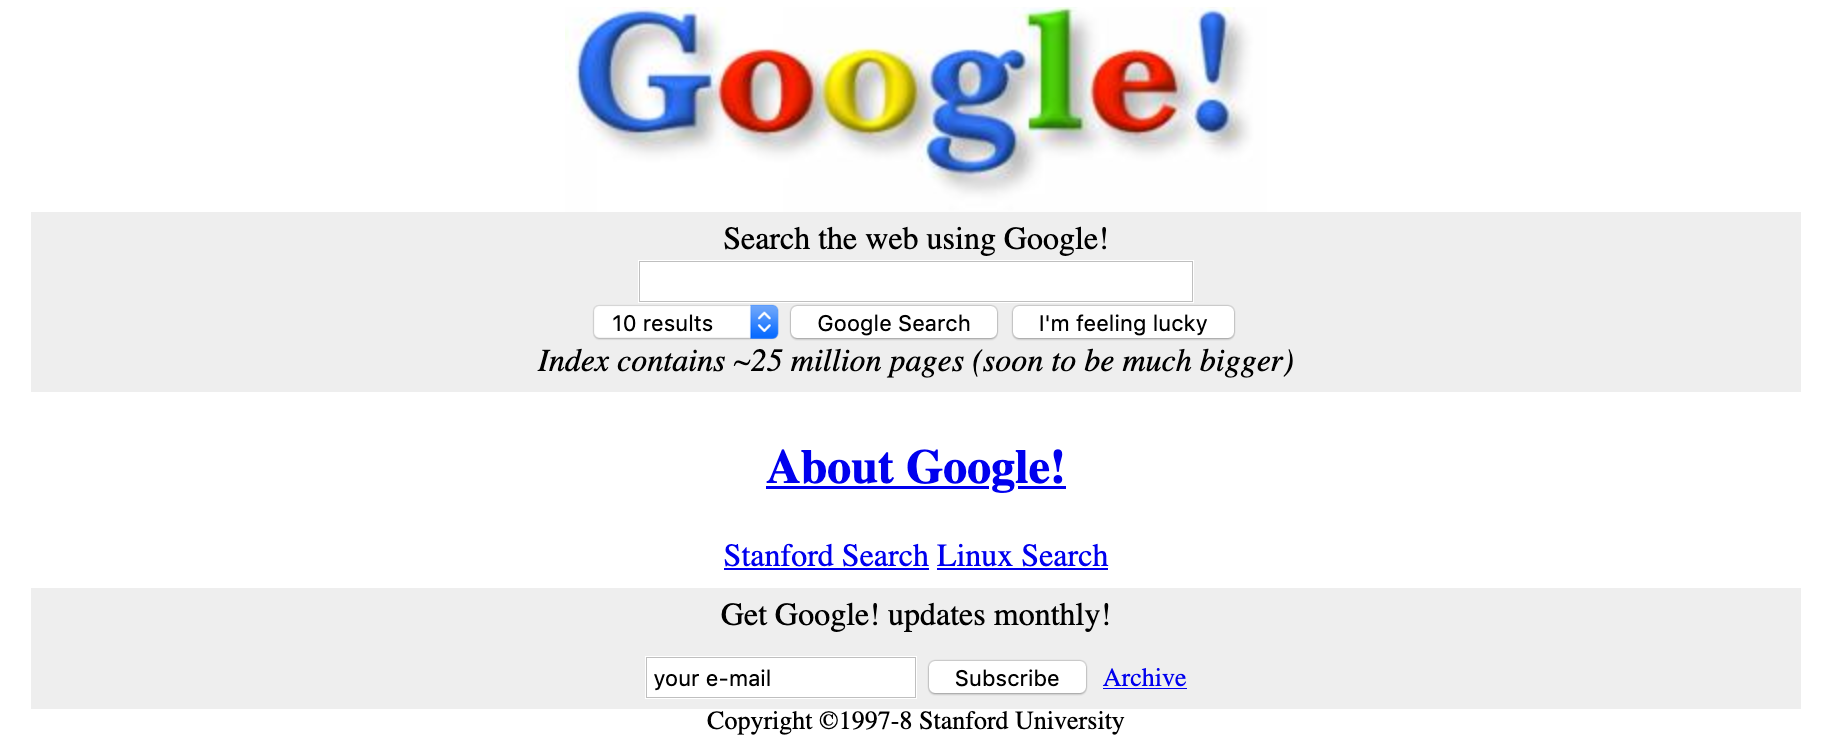
Thus, Alphabet, the enormous company that we know today, started its life with just a single page that performed just a single function, search the web AND rank the results based on their reference counter. That's all. That was their MVP. That is what an MVP means, it's that one unique thing that makes your project special, that will make people care about your project, it's that thing that sets you aside from the competition. The trick is to figure out what that thing is and cut away all the other fat from your idea. But why?
Why do an MVP?
Why bother building out a very minimal product when eventually you will have to build out a fully featured product for your customer anyway? There are two answers. One is simple to understand, one is a little bit more nuanced.
Money
Let's start with the simple one, money. Do you have enough to build everything you want in the first iteration? Do you have enough money to spend on ancillary features before you fully customer validated your core idea? If the answer is yes to both of those questions then one of two things is true. Either you are an enormous corporation with ungodly amount of resources, in which case I am not sure what you are doing on this page, or you simply don't understand the scale of your own project.
"Don't worry about people stealing your ideas, if your ideas are any good, you'll have to ram them down people's throats"
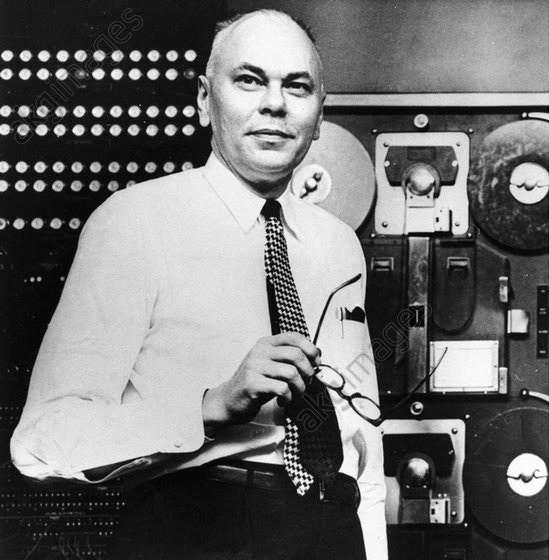
Howard Aiken, the original creator of the IBM's Harvard Mark I electromechanical calculator used in WWII, once said: "Don't worry about people stealing your ideas, if your ideas are any good, you'll have to ram them down people's throats". The truth is, the best ideas are the ones you have to fight the hardest for at the beginning, and usually such ideas are underfunded by the venture capital types, if you can get them to talk to you at all.
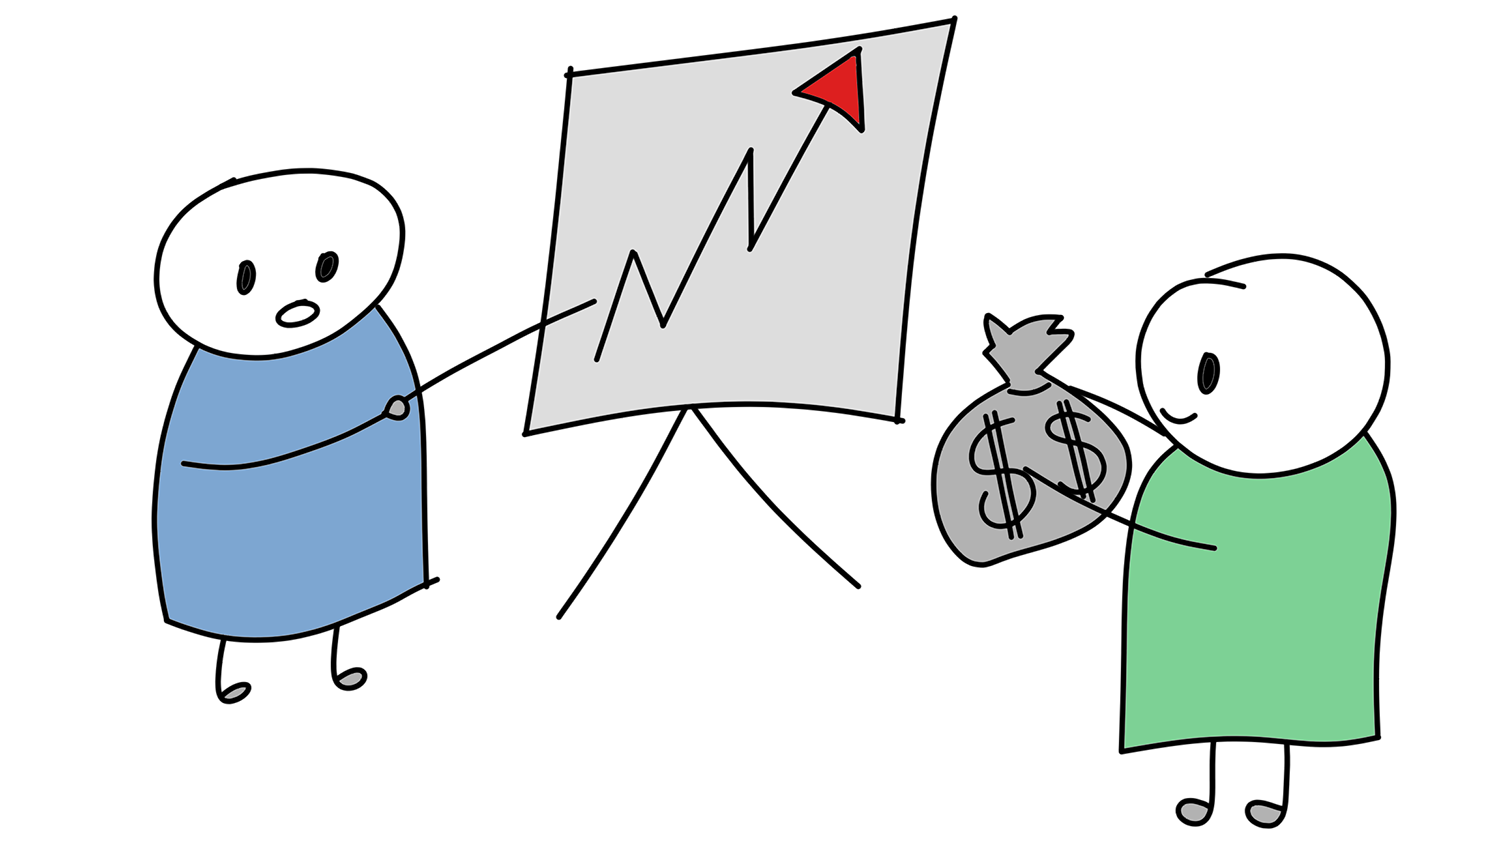
What VCs want to see is traction, which is shortsighted on their part, as only bad ideas can prove up traction very early on. Good ideas, by contrast, always sound "stupid" to the unimaginative, which tend to populate the ranks of the VC corporate suites. There are exceptions, but they are few and far between, so your only alternative is to show traction, and an MVP will do just that for you. Armed with your MVP and user data you'll be able to pull money out of even the most unimaginative VCs by persuading them with something they can't dismiss, real user data. Don't grovel, be undeniable.
So we just covered why you need an MVP in order to convince even the most shortsighted VCs to invest in your genius idea. Now, let's discuss the more nuanced reason why an MVP is a must.
Walk Before Running
We Must Walk Before We Run, Even if Walking is NO Fun. The truth is, no matter how interesting or amazing your idea is, you don't understand it fully. You don't. I know you think you do, but you don't. It's like reading an entire book about tight rope walking across the Grand Canyon. I don't care if you have the best balance in the world, and if you have read everything about tight rope walking in the entirety of the internet. If your first practical experience tight rope walking after all that theoretical research is walking across the Grand Canyon without a safety, you are going to die.
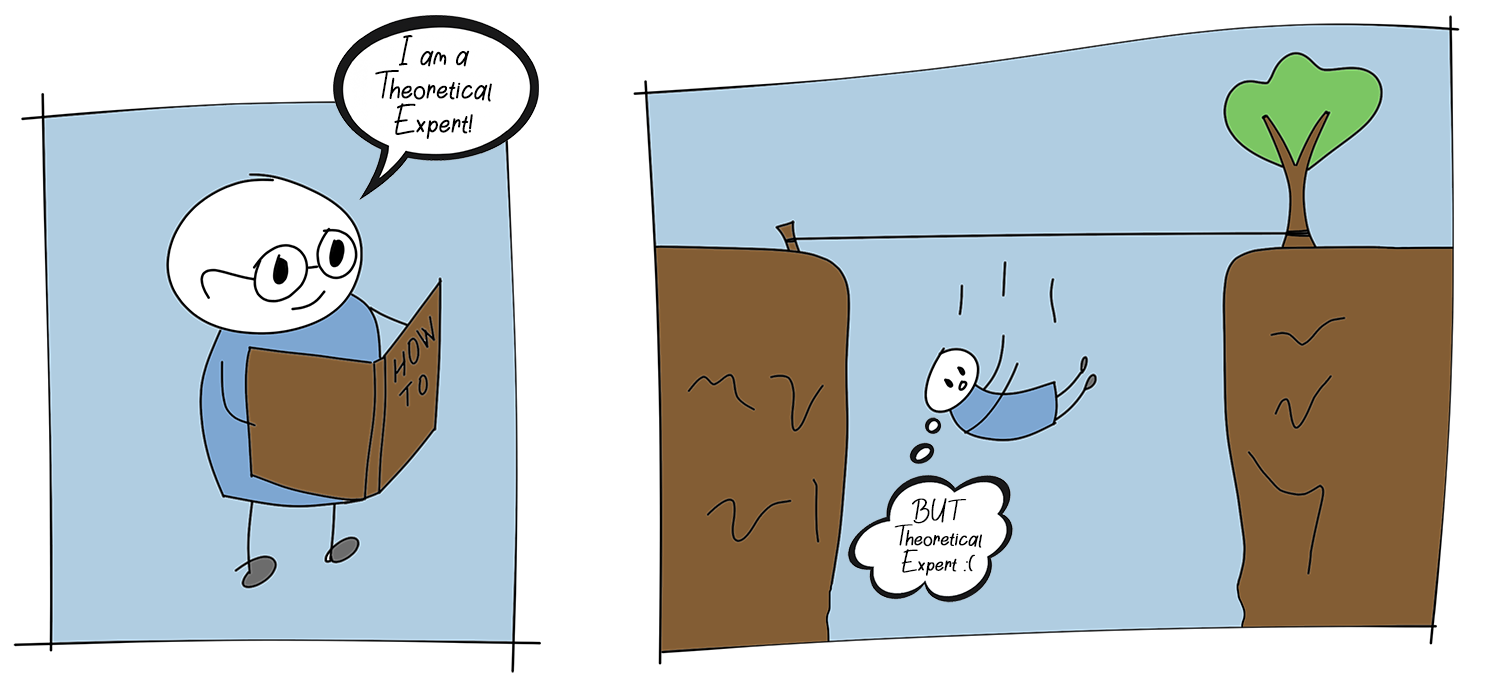
You might be a genius, you might be an amazing athlete, you might be an unstoppable individual with an amazing will power, you are still going to die. Practice, and ONLY practice makes perfect. An MVP is a practice for your V1 of your idea. It's an obligatory step even if you consider yourself a domain expert.
MVP is NOT a POC
Now it is important to point out that an MVP is not the same thing as a Proof of Concept (POC). A POC is something that YOU get to play with and you get to prove to yourself that the idea can work. An MVP is something you get to give to actual customers and allow them to play with it and give you feedback about it. That feedback is crucial. It's not enough to know that you can build it, you must find out those famous "unknown unknowns", and only real customer feedback will give you those.
MVP by Example
To really drive the point home let's look at a simple example using a household item that we are all familiar with, a microwave. We will use a microwave because you are likely familiar with its operation, and it is sufficiently technically sophisticated of a product to justify both a Proof of Concept and an MVP. While we are using a hardware example, with a little imagination, you can see how this can easily apply to a software project as well.
The original household microwave was the Panasonic NE-550. It was first sold in 1966 even though the concept of using a magnetron (an electromagnetic wave emitter) to heat food was originally discovered by accident in 1946, when an engineer found his chocolate bar melted in his pocket while testing a magnetron in a lab. It took 20 years to go from idea to a final refined product available to the home consumer. Prior to 1966 there were many commercially available microwaves on the market, but both their cost and size made them prohibitive for the residential market, and they were mainly marketed to commercial kitchens.
But enough backstory. Let's imagine for a second that we have just discovered that microwaves can heat food by vibrating water molecules inside said food, and we want to take this product to the masses. What's our strategy? Well, first we need a Proof of Concept.
In this case a POC would be a crudely constructed cooking chamber with a magnetron attached to it. The device would have an on and off switch and perhaps pods (variable resistance potentiometers) to control the wavelength and power of the magnetron. This would be a far too dangerous of a device to ever entrust into the hands of a regular consumer, but it will provide us with an invaluable test platform for our idea in the lab. We can use it to refine the specific wavelengths and power settings that produce the best results and prove to our potential VC investors that our idea works in theory.
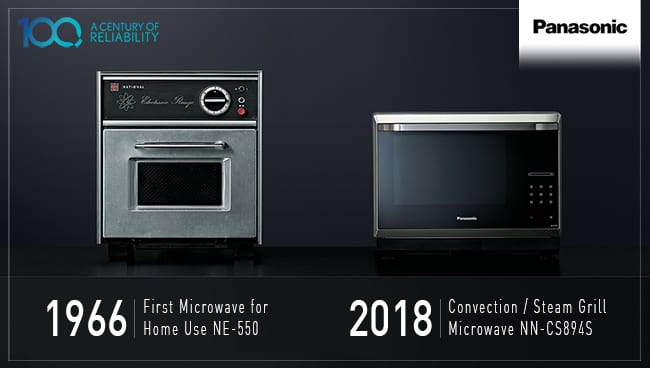
Next, we would build an MVP prototype. The MVP prototype would be far simpler than the microwaves we know today. That original Panasonic NE-550 only had a start and a stop button, and a rudimentary mechanical dial timer. Nothing more. No popcorn settings, no built-in thermometers, no fancy features. Just the essence of the microwave. This is what we would build as an MVP and ship it out to some real world end users. This is where we get to show traction and raise money to make the next version of the product with all the bells and whistles we originally wanted as well as all the bells and whistles suggested by our early adopters.
So, shall we build an MVP?
The 7 Step MVP Process
Before we dive deep into all the fancy terminology that the tech industry has developed for all the dev stages let's first list the 7 essential questions that we want to answer during the MVP process:
- What are we building?
- Why are we building it?
- How are we building it?
- What tools, techniques, and equipment do we need to build it?
- Can we scale it effectively?
- Does it work as intended?
- Now that it's live, how can we make the product better?
Now that you have the roadmap, let's talk about each of the individual steps in the process in detail and explain why those questions need to be answered, and why they need to be answered in that specific order.
To help us walk through these concepts let's use an example. For NDA reasons we CANNOT talk about our client's products, so instead let's imagine a hypothetical project, something simple and relatable, but with sufficient complexity that we can solve some interesting real world challenges.
Let's imagine a client comes to us with a product idea for a smart toothbrush that monitors your teeth brushing. The brush comes with a companion mobile phone app, and the client is looking for us to help them design both the hardware and the software for the product. Let's run through 7 MVP steps and see how we can turn this idea into reality.
Ideation
This is where we figure out the big WHAT and the even bigger, and the far more important, WHY. While the ultimate why for any business person is to make money, that is not the why we are after. We are after the WHY would a consumer of this product want it in the first place, what pain point does this product solve for the consumer. With that in mind, let's take a look at our smart toothbrush example.
Our process usually begins with a lengthy client interview. In this case, we would ask the client why they think it is important for people to know how long and how often they are brushing their teeth? What pain point does this product address? Has it been solved already by someone else, but perhaps in an unsatisfactory manner? Or, has it not been solved prior because either the technology or science necessary to solve it wasn't around?
Given that our client is hypothetical, let's imagine a hypothetical response. Our client, as it turns out, is a dentist and also a parent. As a dentist, our client knows that it is very important for kids to regularly brush their teeth. As a parent, our client knows that kids have far too many other exciting things to do with their life than brushing their teeth, and often forget, or willfully neglect the task. But, there is a twist! The client also has an elderly father with early signs of dementia, who often forgets to brush his teeth. So the client wants to also market this to people with elderly parents and even nursing homes.
By talking to the client and digging really deep into the reasons why they want to build the product that they want to build as oppose to just asking them what they want we were able to establish two distinct target markets for this product. More important, we figured out a pain point that this product is trying to solve.
At first glance, one would assume the pain point would be helping the user of the toothbrush get more data about their own teeth brushing habits. In fact, most development shops, who don't follow our opinionated approach, would make that assumption. However, the real pain point that the client is trying to solve is monitoring the teeth brushing patterns of his loved ones, more specifically, his children and his elderly father. That's the pain point the client wants to solve for the customers of the smart toothbrush as well.
A lot of the times the clients don't actually fully understand the pain points they are trying to solve. No, that's not entirely accurate, they understand the pain point instinctually, any good entrepreneur does, but they have a difficulty conveying that pain point, and as a professional design and development shop we are paid to extract and verbalize those pain points. At our shop we cast to the side the old "the customer is always right" approach. You pay us to find weaknesses in your plans, you pay us to push on your assumptions, as well as our own, and see which ones collapse under scrutiny. If you don't get pushback from your design and dev shop about at least one aspect of your idea during ideation, that's a clear sign that they don't care about your project.
Now that we are armed with the WHAT and the WHY, let's look at the HOW and the WHEN in the Design phase.
Design
During the Design Phase we figure out the next most important question, the HOW. More specifically, how are the users of our product going to interact with the product and what features do we need to provide to support those interactions? These are generally called user or customer workflows.
Workflows
A workflow is just a description of a step-by-step process by which the user would interact with our product. It is commonplace in the industry to also call these "user journeys", but I find that term to be unnecessarily pretentious, especially when used to describe a task as mundane as brushing one's teeth. Just imagine, "Mommy, mommy, I had an amazing teeth brushing JOURNEY today!" I suppose "Mommy, mommy, I executed a flawless teeth brushing workflow today" isn't much better, but we have digressed. Let's write a quick workflow for the smart toothbrush.
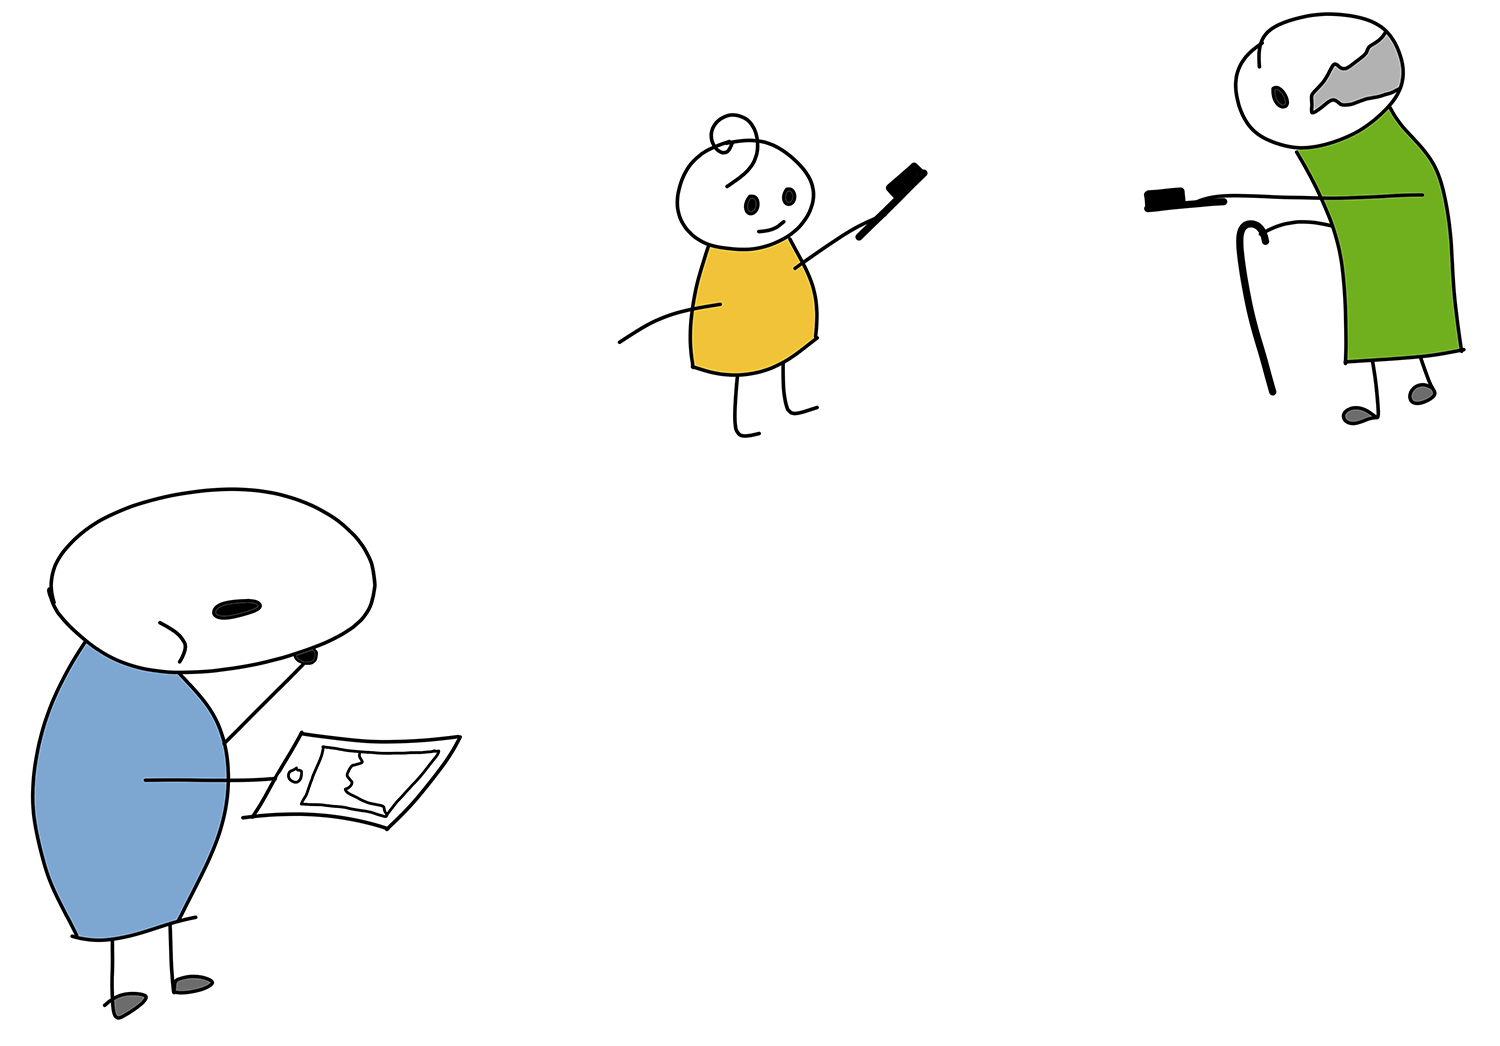
In the ideation section, we have identified that our target product will have two types of users. The first user type is the parent or administrator of the toothbrush. That is the user who checks up on the teeth brushing logs but does not use the smart toothbrush personally. (Note, the administrative user may also use a smart toothbrush for their own toothbrushing needs, but what makes them the administrator is the ability to see tooth brushing logs from other tooth brushes.)
The second user type is the toothbrush user. They can also see their logs on their own device, but cannot check up on other toothbrushes registered to other users.
First, let's run through a workflow for a user using the toothbrush. This one is really simple:
- User picks up the brush and starts brushing their teeth. The brush turns on and starts providing feedback.
- The brush indicates to the user how long they have to keep brushing in each section of their jaw, and when they have brushed sufficiently through visual and tactile feedback (LEDs and Vibrations).
- Optionally the brush plays videos for the users on their phone while they are brushing their teeth. The customer envisions this as a feature where the phone would play cartoons for kids on their iPad or phone while they are brushing their teeth to encourage them to do so well. This is a post MVP feature (more on this later).
- The User rinses their toothbrush and places it back on the counter. The brush turns off. The information about the toothbrushing session is uploaded to the iPad or phone, if one is in the vicinity, or stored on the toothbrush until it can be downloaded to a paired device.
That was simple, now let's take a look at a slightly more nuanced workflow. In this workflow we are going to have the administrative user check up on their elderly parent and see when was the last time they brushed their teeth and for how long. (You see, it is a circle of life. Your parents used to check up on you, now you have to check up on them.)
So we have User Alice, the administrator, and her elderly father, User Bob, who lives on the other side of town. This workflow is a bit nuanced because it happens in reverse. Just follow the steps below and you will see what I mean.
- User Bob dutifully brushes his teeth and puts the brush down on the counter. The brush begins the data upload process by locating and connecting to Bob's smartphone via BLE connection. (This is actually a complicated step that has hidden complexities that we will address in the architecture section.)
- Bob's phone processes the new data from the toothbrush and uploads it to the smart tooth brush cloud server using the phone's internet connection.
- The smart tooth brush cloud server pushes new information to Alice's phone.
- Alice's phone receives notification of a new toothbrushing event from her father. She can click on the notification to see all of the information included in the update.
Of course if we were developing our smart toothbrush for real we would develop about half a dozen more workflows for login, account creation, and a bunch of other user interactions. But since this is just an example we will stop here.
The point of the workflow is to stimulate our imagination and allow us to figure out some of the less obvious aspects and features of our future product. For instance, even before having a prototype, step 1 of the second workflow we described is already posing some serious technical challenges and will guide our decision making in the Architecture phase. But even the more mundane aspects of our product can be greatly improved with proper workflow description, a step that many development shops like to skip.
Now that we know WHAT we are building, WHY we are building it, and HOW it should work, the next step is to refine the HOW and figure out how it should look. This is the "fun" bit, but it's important not to go into this process blind. Without the WHAT, the WHY, and the Workflows you have a good chance of creating a great looking but ultimately failed product, and as a startup you want to maximize your chances of success, the reality of our world will optimize for failure all on its own and doesn't need your help.
Prototypes and Wireframes
For hardware products we build prototypes. For software products we build User Interface (UI) prototypes, which are commonly called wireframes. They are called wireframes because they usually consist of grayscale rectangles with black borders, which makes them look like frames made out of coat hanger wire. In both cases, for both hardware prototypes and software wireframes, the crudity of the prototype is NOT a bug but a feature of the process.
We create crude looking prototypes to optimize for speed and to make sure that our clients don't fall in love with the design of the prototype itself. We are strictly looking at the functionality of the product at this stage, not its aesthetics. This is occasionally disorientating to the client. To avoid this disorientation, some other shops strive to make their wireframes and prototypes pretty. This is a big mistake.
You see, as a human being, your brain is wired to love color. Color, especially reds, blues, and greens, make your brain happy because they usually signify food. I know, it is a very low level subsystem in your brain, and you are probably not aware of it consciously, but it is there. That is how we've survived for millions of years as a species.
For instance, above are 2 identical wireframes from an old project, one is all grayscale, the other we added color to. In all other respects they are identical. Which one do you instinctually like better? My money is on the colorful one, but does that mean it's better? Well, no, they are identical in function. By definition one can't be better than the other, but your brain is drawn to the colorful one. What if now I tell you that that colorful feature on the wireframe has to go because it's difficult to implement or because it doesn't work with the workflows we have established. You will be sad! But why? It's the color. It made you fall in love with that feature even though we haven't finalized it yet.
That's the problem with colorful wireframes and high fidelity prototypes, they fail at their fundamental purpose. The purpose of the prototype is to convey usability of features, not final visual design. The design comes later, we call it skinning the prototypes.
In our smart toothbrush example we would create grayscale wireframes for the mobile app and a 3D printed prototype of the toothbrush out of white filament for the actual physical toothbrush. We would likely source a replacement head from an electric toothbrush already available on the market, say from Phillips, and would work it into our physical brush prototype in order to allow our client to actually use the brush as intended to check its functionality (something tells me that 3D printed brush bristles are not ideal for your gums).

These prototypes would allow our client to imagine better their future product and to suggest changes and improvements. The crudity of the prototypes allows us to make several versions providing our customer with options. We have found that entrepreneurs, even experienced ones, have a much better time imagining and reasoning about their future products when you give them several options to choose from. If you show a client just one prototype, often enough, their imagination anchors around that prototype. By contrast, if you show a client several prototypes, their imagination has a harder time anchoring around one specific design, and it allows the client to more freely explore the possibilities of their future product by picking and choosing features and design patterns from different prototypes presented to them.
As a design and development shop, this is a tool you want to use sparingly. Some clients love options and can quickly and easily refine their vision when you give them possibilities. Other clients, especially less technical ones, are sometimes overwhelmed by options, and would much rather "borrow your sense of style", after all, that is what they are paying you for.
We usually determine the type of client we are dealing with during the ideation stage and are very upfront with our clients about which category they fall in. After all, it is possible to misread the situation. We found that this technique gives us the best of both worlds. Clients who want to refine their product by picking and choosing from various options get what they want, and the clients who want to use our expertise and style get what they want.
Skinning the Prototype
Next, comes the really fun part. If you've ever built a house, this is the part where you get to pick out your fixtures, your toilet, and your draperies. This is often an ongoing process with the client. Usually, after finalizing our MVP prototypes and wireframes (step above) we just move on straight to the architecture while continuing to work with the client on the UI and visual design.
This process is a little different for hardware versus software development. With software we have the luxury of continuing to work with the client almost to the very end on the visual look of the product. With hardware everything is much more difficult. Making a change in software could be as simple as one line of code and a recompile. With hardware there are lead times, tooling and process considerations, etc, so every change takes much longer and can require significant architectural changes.
As a result, we always shoot to do our best to finish the skinning process for at least the hardware, but ideally for both the hardware and software, by the time we are roughly 50% through the architecture process. So let's take a look at what is involved in skinning our smart toothbrush example.
For the smart toothbrush we would create a color and materials prototype for the brush itself. For instance, let's imagine our toothbrush is going to have an aluminum body and plastic head. We would cut the body on a CNC Lathe and 3D print other components out of Nylon or another suitably strong plastic. The final result will be an aesthetically accurate (as accurate as practicable) prototype. It's not going to actually work, nor will it have any electronics inside. But it will be a good representation of the look and feel of the final product.
Same is true for the app itself. We would create a clickable UI demo. A clickable UI demo allows the client to step through all of the major workflows for the application and see the general layout of all the MVP screens. None of the app is functional at this stage, but it's enough to get the feel for the final product. Once the client is happy we Architect and Build!
Architecture
The first two steps of our process, ideation and design, were all about communication with the client. In those steps, we take the time to fully grok our client and their project. While essential, these steps are often missed by the new crop of "Agile" shops. We believe this is due to fundamental misunderstanding of the agile manifesto. We will go more into all the benefits of agile development in a future article entitled, "You are not Agile if...". But for now, let's stick to running through the MVP process.
Architecture is all about figuring out how to practically build our client's vision. In this stage, we figure out tools and technologies that we will need to use to produce our client's MVP. Let's go back to our toothbrush example.
So at this point, here is what we know:
- Our toothbrush needs to sense when a user picks it up and uses it.
- The toothbrush has to communicate with a phone via Bluetooth.
- The phone needs to report the information to some kind of central server.
We also have wireframes of the app, prototypes of the smart toothbrush, and a full description of features we want to support before AND after the MVP. Now comes the hard part, cutting down the features. What?!
Chopping Down the MVP
Yes, you read that right. Now that we know what we are building and what it needs to do, we need to figure out what it doesn't need to do immediately upon launch. But why on earth would we be doing that? Well, refer to the beginning of this article. If you have unlimited money and unlimited resources, then sure we can build it all and we can make it all perfect and high quality right at launch. But let's be realistic here, you don't have those resources, and this is why you are here, instead of talking to your own R&D department with a billion dollar budget. And even if you have access to unlimited resources to develop your project, do you REALLY want to blow your resources on a yet to be proven product? Wouldn't it be better to launch the product with minimal features useful to the customers and then build additional features when you have proven success in your hands?
Ok, ok, but why now? Why did we spend all this time outlining all the features during ideation and design, only to chop them now? In order to know what to chop, you first need to know what is available for going on to the chopping block. More important, you don't want to paint yourself into a corner. Let's keep running through our example so you can see this in action.
In one of our workflows we discussed how the user's phone, after sensing that the user is brushing their teeth, would play either a cartoon or an entertaining message while the user is brushing their teeth. This feature is designed to encourage children to brush their teeth by essentially bribing them with entertaining cartoons. But this feature involves developing a hosting server for the videos, licensing video content, and developing a relatively sophisticated phone app. This feature, however, requires no hardware changes for the toothbrush. This is how we know that is a perfect candidate for a pre-MVP chop.
The video playback feature requires significant upfront investment on our customer's side. It adds to the product, but it doesn't make or break the product. It is a nice marketing feature, but it is not THE feature. And, because it doesn't require hardware changes, this is something we can roll out to our customers post-MVP, thus improving their original investment in the smart toothbrush through software alone.
We haven't fully developed a full set of features for our example toothbrush product so it is hard to pick other features to chop, but the general pattern is always the same. Look for features that are good for marketing, but are not essential to your product. Features that are nice to have but will not ultimately solve your customers' pain point. And look for features that can be added later through software updates, in order to continue to delight and impress your customers. Don't view the process of chopping those features out as a negative. View it as an opportunity to really concentrate on the core features of your product, and a future opportunity to delight AND monetize your MVP customers.
For instance, in this case, our customer can introduce the video playback feature in the future, and make it a $3 per month subscription for the parents to pay for the licensing of the content. BOOM! Future delighted customers and future ongoing revenue stream.
But it is essential to consider all of the features you want to introduce in order to make sure that the technologies we use in the core of the product can at least theoretically support the features the customer wants to add post-MVP. This is the proverbial not painting yourself into the corner concern.
Figuring Out the Technology Stack
In the Valley, it is very popular to discuss technology stacks with little to no understanding of the underlying product. This is a fundamental failure of understanding how technology should work. Just because you are excellent with a hammer, doesn't mean that everything out there is a nail, though some in the Soviet Union never had any issues using a hammer to hammer in a screw, but then again, this is why Soviet era construction isn't world renowned for its high quality.
At Zynath we love Flutter. If you are familiar, Flutter is a wonderful framework from Google that allows you to create applications that can be cross compiled to run natively on both iOS and Android. Sounds perfect for our toothbrush project, right? Well, let's look at it closer.
Our project requires the toothbrush to initiate a Bluetooth low energy (BLE) connection with a cell phone in order to report tooth brushing event updates. Establishing a BLE connection from an app written using Flutter (and the Dart programming language) is trivial. There is even an excellent library for it. So connecting from an active phone that is actively running our app to the toothbrush is trivial. But what about the other way around? Remember, we need the toothbrush to initiate the connection and the smart toothbrush app may or may not be currently open and running on the user's phone, does that work? Well, that's considerably more complicated.
You see, modern phones are very aggressive about killing background processes to preserve your battery life. This means that when our smart toothbrush reaches out to the phone, the phone will simply ignore its connection. However, both Android and iOS have built-in systems to get around this problem. For instance, on iOS, a developer can use native API calls to register an application with iOS's BLE service that will wake up the application and pass messages to it if it sees a particular BLE device transmitting a particular message. Basically, as a developer, you ask the operating system to watch out for a particular message, and to wake you up if that type of message is received. However, this can only be done using native code (Swift on iOS and Kotlin on Android).
While it is still possible to develop our app in Flutter, and break out the BLE functionality into native code, the far easier and much more elegant approach would be to adapt a stack similar to the one used by Amazon in the Amazon mobile app. If you look carefully at that app, you will notice that most of it is just a website running in a web view. A web view is just a UI element that can display a website if you pass it a URL. Rather than building two separate apps, one for Android and one for iOS, Amazon builds one web app (think mobile website) and then builds two very simple skeleton apps in native code, one for iOS and one for Android. Those skeleton apps point to the feature rich web app that Amazon hosts on their servers. The point of the native app is simply to handle OS specific functionality, such as notifications, or, in our case, BLE communication.
Since our smart toothbrush app is relatively simple in terms of UI Flow, we can easily adopt the Amazon model and develop the core of the app to be a single page progressive web app while handling the BLE functionality natively in a small and easy to develop native application wrapper for both iOS and Android.
Thus, Flutter, as great as it is, is out, and React JS + Native Code is in, because an application stack shouldn't be whatever is cool and new, but whatever is the right fit for the project at hand.
Writing Development Docs
It is often said that what separates great engineers from great tech leads and system architects is ability to write.... in English (or pick your favorite human language). Technical documentation is essential, even for Agile teams! To build quick we need to scale up our dev team and that means, bringing in onboard developers who haven't sat through ideation, design, and architecture meetings, but they still need to know the vision. Clear, concise, and most importantly, precise documentation is a must before we can jump into the development phase.
Think about it this way, you are building a house. The first day on a job site you have a bunch of people ready to pour the foundation for the house. But unless you have precise and easy to understand blueprints detailing the positioning of the said foundation, a disaster will ensue.
Development
Now we build! Not much needs to be said here, we follow industry standard processes in this respect. Break up the project into modules, develop 1-2 modules at a time in short sprints, and wow the client with progress. A module is a group of loosely related functionality.
For our smart toothbrush project, we actually have three major sub-projects. The first one is obvious, the physical toothbrush itself. The second one is the native app that will handle BLE communication between the toothbrush and our web app. Finally, the third project is the actual web app itself.
Ideally, you would set up three development teams to tackle these three projects. Let's take a look at rough module break down for each one of these teams. This is for illustration purposes only, please be kind and DON'T rely on this roadmap to build your own smart toothbrush, or at least don't blame us if you fail :)
Hardware Dev Team
PCB and Electronics
- Design PCB and Electronics
- Develop Bill of Materials (BOM)
- Develop Supply Chain or a Relationship with PCB Manufacturing Partner
Firmware
Enclosure
- Research Appropriate Manufacturing Techniques
- Create Tooling or Establish a Relationship with Enclosure Manufacturing Partner
Retail Packaging
- Create Packaging Prototypes / Work with Client Marketing Team
- Establish a Relationship with Packaging Partner
Native App Team
- BLE Communication Protocol - We would build on top of GATT. This module needs to be done by the time HW team gets to Firmware development.
- iOS App
- Android App
- Integrate Web App
Web App / Backend Team (Full Stack)
- Hosting / Backend Setup
- Database and Data Architecture
- Users and Authentication
- User Dashboard
- User Settings
Testing
While we broke testing out into its own chapter because it is an essential step, testing is NOT something you do AFTER development. Testing is an integral part of the whole process and should be done at EVERY stage. There a 3 types of testing you want to do, dev testing, user testing, and economic testing. Think about it this way, you want to continually get answers to the following questions:
- Did we build what we wanted to build?
- Did what we build solve our customers pain point?
- Is it still economically viable to produce this product?
Hopefully, you get a yes on all of those questions, repeatedly and at every stage of the project. If you get a no for any of them, then it is time to seriously reexamine the project and figure out if something is going wrong. Everything is fixable, but not until you figure out what is actually broken.
Deployment
Deployment is the easy one, assuming you've done everything else up to this point properly. Analogize deployment to the final sign-off from the building inspector, in a house construction example. Assuming your architect, your engineer, and your contractors have done their job properly, you have nothing to fear. And, if those professionals cut some corners, then this is exactly when this is going to come and bite you right in the ass. This is why we don't have much to say about deployment, we usually do things right, and if something does go wrong, it is usually easy to fix.
In our smart toothbrush example, this is when we would make our app live in the app stores and deploy the product into the distribution channels. The second part of that is up to our client and their marketing and distribution teams.
Once deployed we have an MVP! Wooohooo! But what's next?
Evolution
The MVP is live! What now? Well, now we start the cycle all over again. We learn from the customers' feedback, sales, and internally gathered usage statistics. Using the data, we go back to ideation, develop some strategies on how we can improve the product, and then take those individual features or strategies and run them through the entirety of the MVP process all over again. This time, of course, the process is much quicker. We are not doing major development, now we are just doing upgrades and renovations. This process is likewise unique to every project so it is hard talking about it in the abstract.
Rather, instead, let's discuss it together once we get YOUR product to this stage!
Conclusion
In this article we covered how we at Zynath see the MVP process from the Ideation stage all the way down to rolling out your product to the customers. Every firm has a process unique to their culture, this is our process, and it may differ from the process you are perhaps familiar with.
Because we are an opinionated shop, we place a lot of emphasis on understanding clients needs, and prioritize those above cool new technology we like using or even the customers initial wants which may be contradictory to their actual needs.
There is no such thing as an ideal approach that works for every startup. Our approach works great for larger projects with less ability to pivot on a dime, such as projects in the medical or finance industry, or anything that has a hardware component. In those projects the lead times are such that a little upfront planning pays huge dividends down the road.
We also do purely software projects with lots of opportunities to quickly experiment and pivot. With those projects we follow a much looser version of this above process in order to allow our customers to jump into the market faster. The right approach is the approach that's right for a particular project.
So, what do you think, will our approach work for your next MVP?